Hey there folks its Abhishek Sinha currently pursuing Web Master Plus Course from ADMEC Multimedia here in Rohini, New Delhi. As a part of my course, WordPress Basics is completed and as always I was given a blog to write on the same. So let’s start shall we
Introduction
WordPress is a Content Management System in layman terms it is what we can use to manage the content related to a web which, yes one can create edit and publish without much effort these contents are stored in the specific database, in this case, it is MySQL. CMS or say Content Management System are further categorized in Content Management App and Content Delivery App. Now the Content Management App is something of a GUI and Content Delivery App is a kind of management of the core files. Note: The perk of using WordPress or any CMS is that it is SEO friendly and you don’t have to have programming knowledge at all and this applies only to the basic and that’s what I’ll be covering here. Let’s start from the start, so
Step1: Go to Google and search for WordPress
Step2: Now look for wordpress.org and wordpress.com
Note: WordPress.com and WordPress.org are not same .com redirects you to a different site which has certain limitations and restrictions but it’s the simplest way to make a page or five and make them running but the real stuff is in .org site from there you can download for the whole WordPress and get started.
As said to work on WordPress you are not required to have programming knowledge but setting it up on a live server can be tricky job for anyone. I recommend using hosting support if you don’t anything about it.
Difference between WordPress.com and WordPress.org
WordPress.com hosts your website for free and you just have designed it accordingly but you can’t customize it can’t use plugins and others. On the other hand, WordPress.org gives you complete software that you can install on your local server and customize it how you like it.
And yes I am strictly focussing on WordPress.org. Let’s start with it then One thing I am considering that you know what a web server is and how to set it up and MySQL.
Getting Started
Create a database and name it according to the website you are designing. Now put the WordPress file either in htdocs or www folder depends on the offline server you are using. Now open it in a browser and complete the installation.
The first part in the installation is all about the databases second is about your project and you may want to write down your password somewhere because if you lost its going to be easy for you to get it back especially if you are not a developer. And that’s all for the installation part after completing this you will be redirected to the login page. Submit the credentials and go to the dashboard of the site.
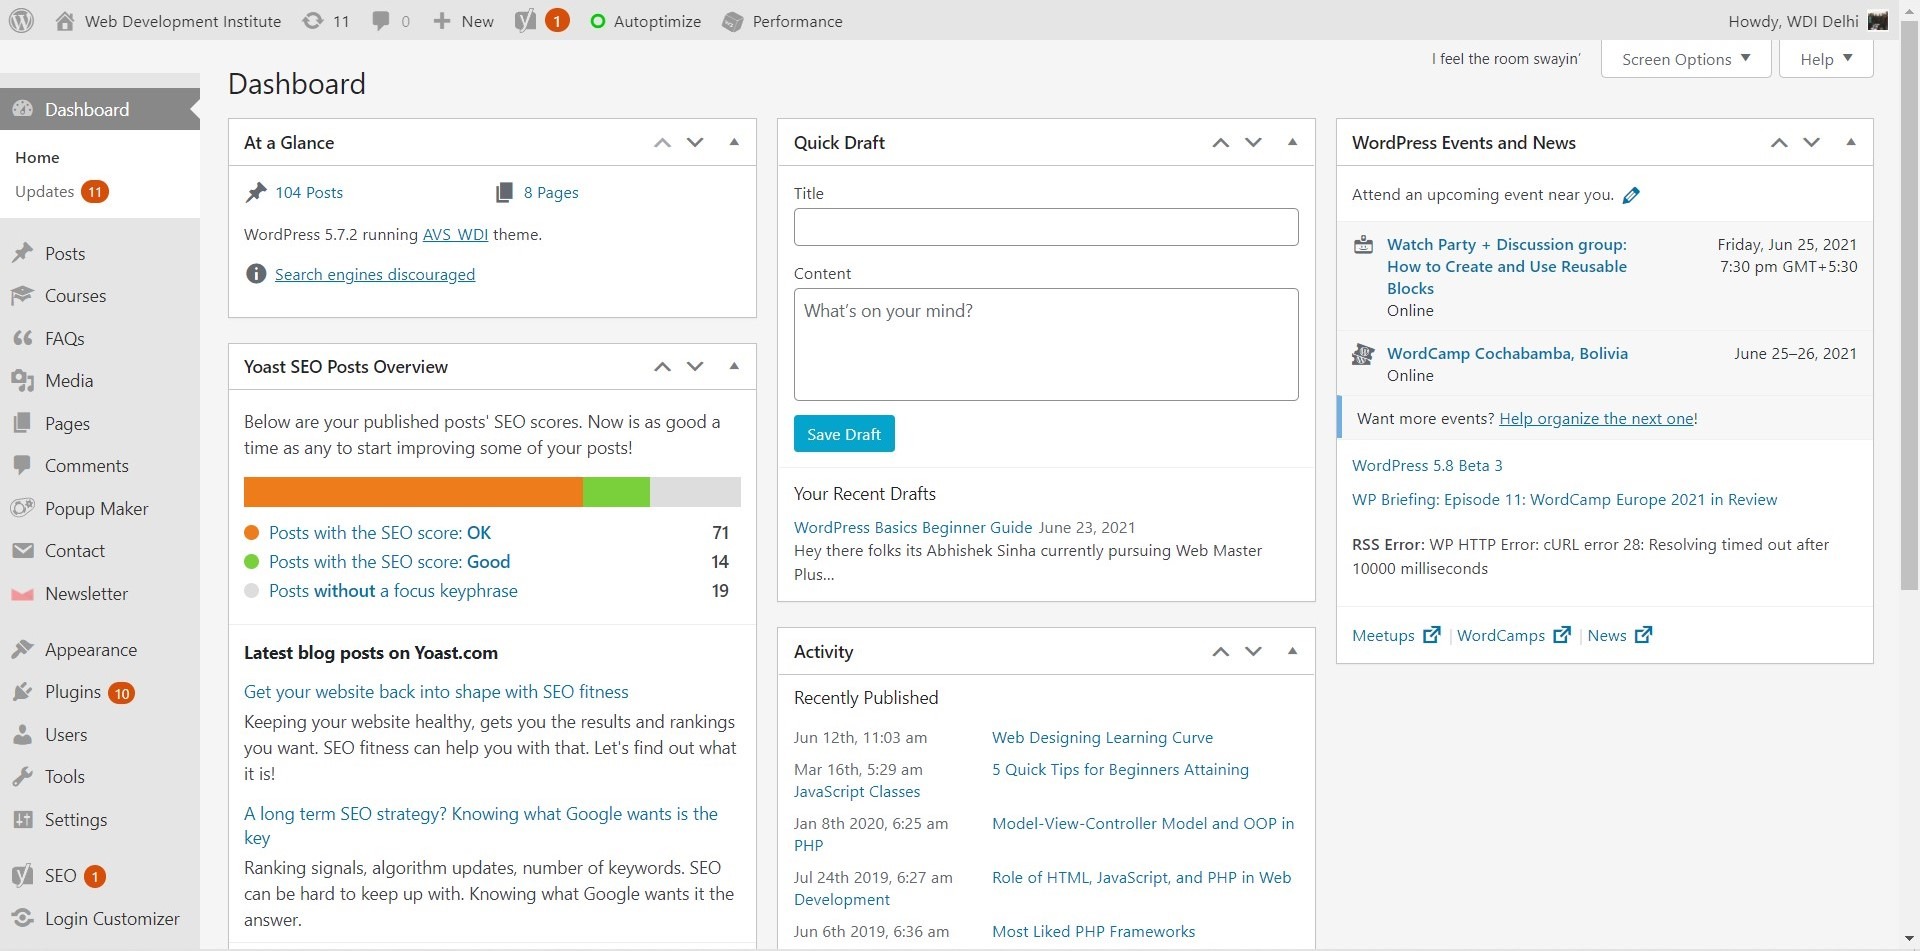
Dashboard
Now the dashboard is the front page of the WordPress here you will get the notifications of various plugins and the comments all, only if you wish to see them. The settings to hide all the notification are present in the screen option settings where one can uncheck the notification wish to not see. The boxes or the container of all the notifications support drag and drop meaning you can change the position as on desires.
Media
Media has two segments Library and Add New all that you upload will be shown in Library and yes don’t forget to give the necessary information i.e., Caption, Title, and if you want to then add description also. It helps in SEO. Now that all your media is imported let’s create a page.
Pages
All pages where you look for all the pages you have created. One can perform all the basic operations to the contents.
Add New, add a title ( page name ), the content has a plus sign which contains blocks in it which are very useful using this one can divide pages into columns add directly HTML code and short codes which we have to use in case of several plugins. From the document menu you can set the featured images, whether you want to add comments option to the page or not now after setting all these you can either publish it at the moment or you can set the time for it and it’ll be shown when the time comes.
Note: Till now you might have understood one thing that this is not programming it’s a software that anyone can use to make the desired website.
Post
All Post which has a table containing all the posts that are ever created and the selection and bulk option works the same in pretty much every section including trash.
Add New this option lets admin add new post or blog there is a various option provided to customize the appearances and working. Admin can select and create new categories from the right-hand side menu the same for the tags. You can set the featured image which is displayed at the very top. In the discussion, admin can either allow or deny the comments tracks and pingbacks. The post attribute has a view option to choose display layout like boxed or full width and some are provided with the themes.
Yes, you can make this post to appear at any particular time or just publish it now as you wish.
Difference between post and page
As I have said post is content you wish to upload the information which will be previewed on the particular page and this information can have different taxonomies in which classify it they actually are blogs posts whereas the page can be used to create that page and other pages.
How to change the index and blog page?
Now the situation may arrive when one doesn’t want the default page to be the main or index page of the site. WordPress overcomes this problem very easily
Step1: Go to Settings
Step2: Go to Reading
Step3: then in the homepage settings select the desired page from the drop-down menu for the home and the blog.
Comments
The comments page has a table that displays all the comments in the order you choose. Now admin can directly reply to the comments from here and it can completely modify comments, yes admin can change the status of the comments to display or not. While making the site one doesn’t have to set anything it automatically manages the comments and it appears here only for blog sections.
Page Builders
Page Builders are plugins that we use in WordPress for basically creating a good visual design for our website these page builder also include the options of pre- built templates to ease the building process. The best part about them is a lot of them are just drag and drop.
The most liked page builders are Elementor, WP Bakery, GoodLayers etc trust me when I say this Elementor is the page builder for anyone working on a website where others like WP Bakery focuses more on developer side.
And yes a website can have multiple page builders but it’s not a good idea as CSS styling will start to clash and you can’t use two page builder together on same page.
Plugins
One of the best things about WordPress is that it provides a variety of plugins both paid and free. One can choose the one it sees fit and every plugin has its documentation and usage steps. You can add a new plugin in the plugins add a new section. These plugin actually work as an extension to WordPress if you can’t do anything in WordPress then search in the plugins and you’ll find the thing needed, most probably.
Themes
Like plugins same can be said for the themes you can have multiple themes downloaded and but only one will be activated at a time. There is an additional option of using child themes I would say you should use the child theme as it safeguards your parent theme if you ever say made some changes to the theme and you don’t know how to revert it then all you need to do is delete the child theme itself and everything will be back to normal.
Customize
When you’ll log into WordPress and open any page of your website you’ll notice there’s an option in the menu called customize. This option contains all the appearance and some extra setting provided by your theme. These setting tends to depend on the theme some theme may have more options inside customize than other. From here you can change the logo and site title.
Note: Throughout the WordPress, if you see table it means that bulk operations can be applied to it. The bulk operation is nothing but the same basic delete edit operation but this will be applied to all the ones selected.
This is a pretty basic introduction to WordPress, it is much more than what I have explained here and if someone who is programmer then it opens a whole new set of opportunities to what it can do with it. Later…